Data Sources can be used to replace text, images and colors.
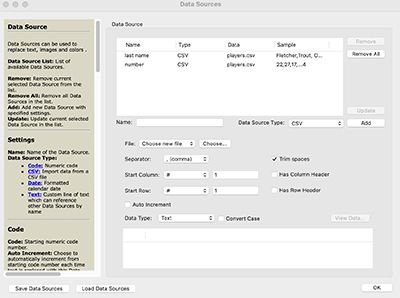
- Data Source List: List of available Data Sources that you have added.
- Remove: Remove current selected Data Source from the list.
- Remove All: Remove all Data Sources in the list.
- Add: Add new Data Source with the specified settings.
- Update: Update settings for the current selected Data Source in the list.
Settings
- Name: Name of the Data Source. This will show up in the Data Source list in the Style tab.
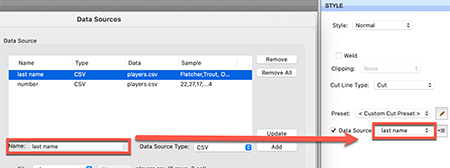
- Data Source Type:
- Code: Numeric code
- CSV: Import data from a CSV file
- Date: Formatted calendar date
- Text: Custom line of text which can reference other Data Sources by name
Code
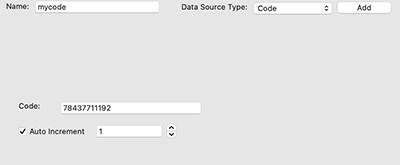
- Code: Staring numeric code number.
- Auto Increment: Choose to automatically increment from starting code number each time text is replaced with this Data Source.
CSV
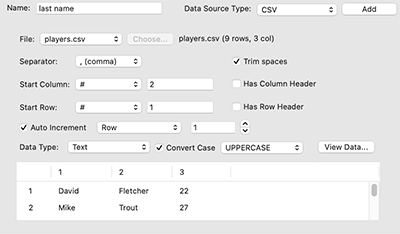
- File: Choose the CSV file to use.
- Separator: Choose what is used to separate columns in the CSV file.
- Trim spaces: Remove extra spaces before and after values imported from the CSV file.
- Start Column: Choose which column to start at.
- Has Column Header: Check if the CSV file uses the first column for row names.
- Start Row: Choose which row to start at.
- Has Row Header: Check if the CSV file uses the first row for column names.
- Auto Increment: Choose to automatically increment by Column or Row each time text is replaced with this Data Source.
- Data Type:
- Color: Color in RGB Hex format (ex. for Red is #FF0000)
- Image: Path to image file. The following shortcut names can be used to make the path
- {home} : users home folder (ex. {home}/myimage.jpg would be equivalent to example Windows path C:\Users\john\myimage.jpg or Mac /Users/john/myimage.jpg)
- {documents} : users Documents folder (ex. {documents}/myimage.jpg would be equivalent to example Windows path C:\Users\Documents\john\myimage.jpg or Mac /Users/john/Documents/myimage.jpg)
- {desktop} : users Desktop folder (ex. {desktop}/myimage.jpg would be equivalent to example Windows path C:\Users\john\Desktop\myimage.jpg or Mac /Users/john/Desktop/myimage.jpg)
- {project} : folder where the current project is saved (ex. {project}/myimage.jpg with current project at {home}/myprojects/project.scut6 would be equivalent to example Windows path C:\Users\john\myprojects\myimage.jpg or Mac /Users/john/myprojects/myimage.jpg)
- {drive} : main computer drive (ex. {drive}/myimage.jpg would be equivalent to example Windows path C:\myimage.jpg or Mac /myimage.jpg)
- Text: Regular text
Date
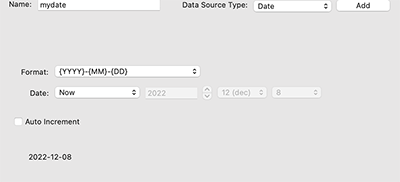
- Format: Choose a predefined date format or Custom to define your own.
- d: 3 letter day name (Mon, Tue, etc..)
- dd: day name (Monday, Tuesday, etc..)
- D: digit day without leading zero (8, 9, 10, etc..)
- DD: 2 digit day (08, 09, 10, etc..)
- m: 3 letter month name (Jan, Feb, etc..)
- mm: month name (January, February, etc..)
- M: digit month without leading zero (8, 9, 10, etc..)
- MM: 2 digit month (08, 09, 10, etc..)
- YY: 2 digit year
- YYYY: 4 digit year
- Date: The start date to use.
- Custom: Specify your own start date
- Now: Use current date
- Auto Increment:Choose to automatically increment from the start date each time text is replaced with this Data Source.
- Days: Increment the day by specified amount
- Months: Increment the month by specified amount
- Years: Increment the year by specified amount
Text
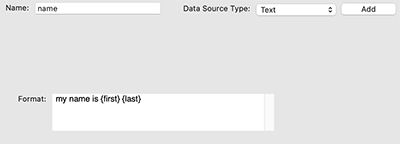
-
Format: Use your own custom text. You can include other added Data Sources by specifying the Data Source Name in curly brackets {NAME}.
Example: If you added a Date Data Source named MyDate, you could enter the Text Format as
Today is {MyDate}


