Some cutting machine models have a built in laser which allows to you do a very precise print and cut (contour cut), where you print out your design with your standard printer and then load it into your cutter so you can accurately cut it out.
First create the design you want to do a Print and Cut for.
You can do a Preview where you will be able to see where the registration marks will be added along with print margins to make sure your design falls within the printable area.

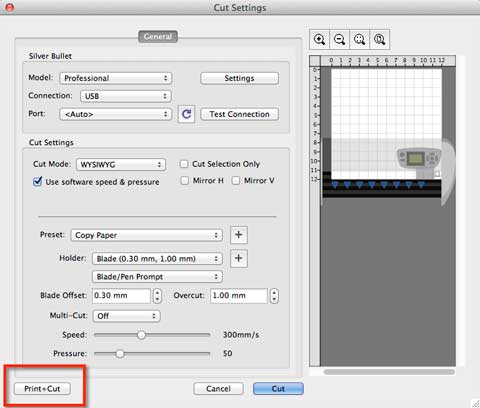
When you are to perform the print and cut, choose to cut your design to bring up the Cut Settings window. At the bottom, you can click the Print+Cut button.
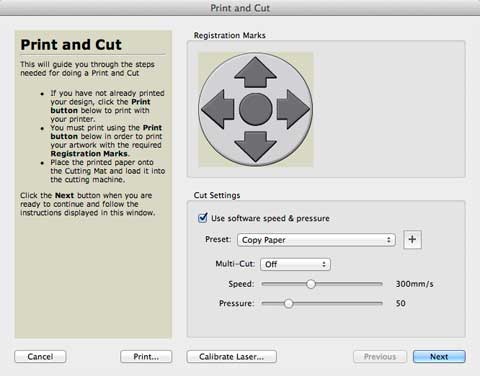
You will now be presented with the Print and Cut window. If you have not already printed your design, click the Print button to print with your printer and it will print your design along with the necessary registration marks around the design.
If you want to print your design outside of Sure Cuts A Lot, please see the tutorial for importing the artwork with registration marks.
Load the printout into the cutting machine and set the origin on the cutter so that the blade is somewhere below and to the right of the printed bottom,right registration mark.
Setting the origin on the cutter is typically done by using the Arrow buttons on the cutter to move the blade carriage. Then you would hit the Origin button on the cutter to set that position as the 0,0 origin point.
Once the origin is set properly, hit the Next button and it will automatically move towards the first registration mark (top, left).
You can then use the arrow keys on the keyboad to move the laser so that it is at the corner of the L shaped mark. (Important: Do NOT use the arrow buttons on the cutting machine to move the laser). To move the laser in larger increments, you can hold down the Shift key while using the arrow keys. To move in smaller increments, you can hold down the Control key. To move in the smallest increments, hold down both the Shfit + Control key.
After the laser is lined up to the first mark, hit the Next button and it will move toward the 2nd mark (top, right). Again move the laser using the arrow keys on the keyboard to the corner of the mark.
When the 2nd mark is lined up, hit Next and it will move toward the 3rd mark (bottom, right). Move the laser to the corner of the 3rd mark and then hit Next and it will then being to cut the design out.


 Cart
Cart